Aloe Vera: Care, Propagation and Uses
Complete aloe vera guide: light, infrequent watering, draining substrate, propagation from pups and gel uses, with the precautions you must know.
By SPRAIA editorial team · Method: botanical sources, field feedback and editorial validation
Aloe vera is probably the best-known succulent in the world, and yet the one we mistreat most often. You may have bought it for its famously soothing gel, or simply because it looked “easy to live with”. Three months later, its handsome upright leaves are flopping, browning at the base or turning soft and translucent. Good news: aloe vera really is a tough, generous plant — as long as you understand that it comes from the desert, not from your bathroom. This complete guide explains how to care for it, how to propagate it for free from its pups, and how to use its gel sensibly, without making the mistakes that kill it.
Getting to know aloe vera
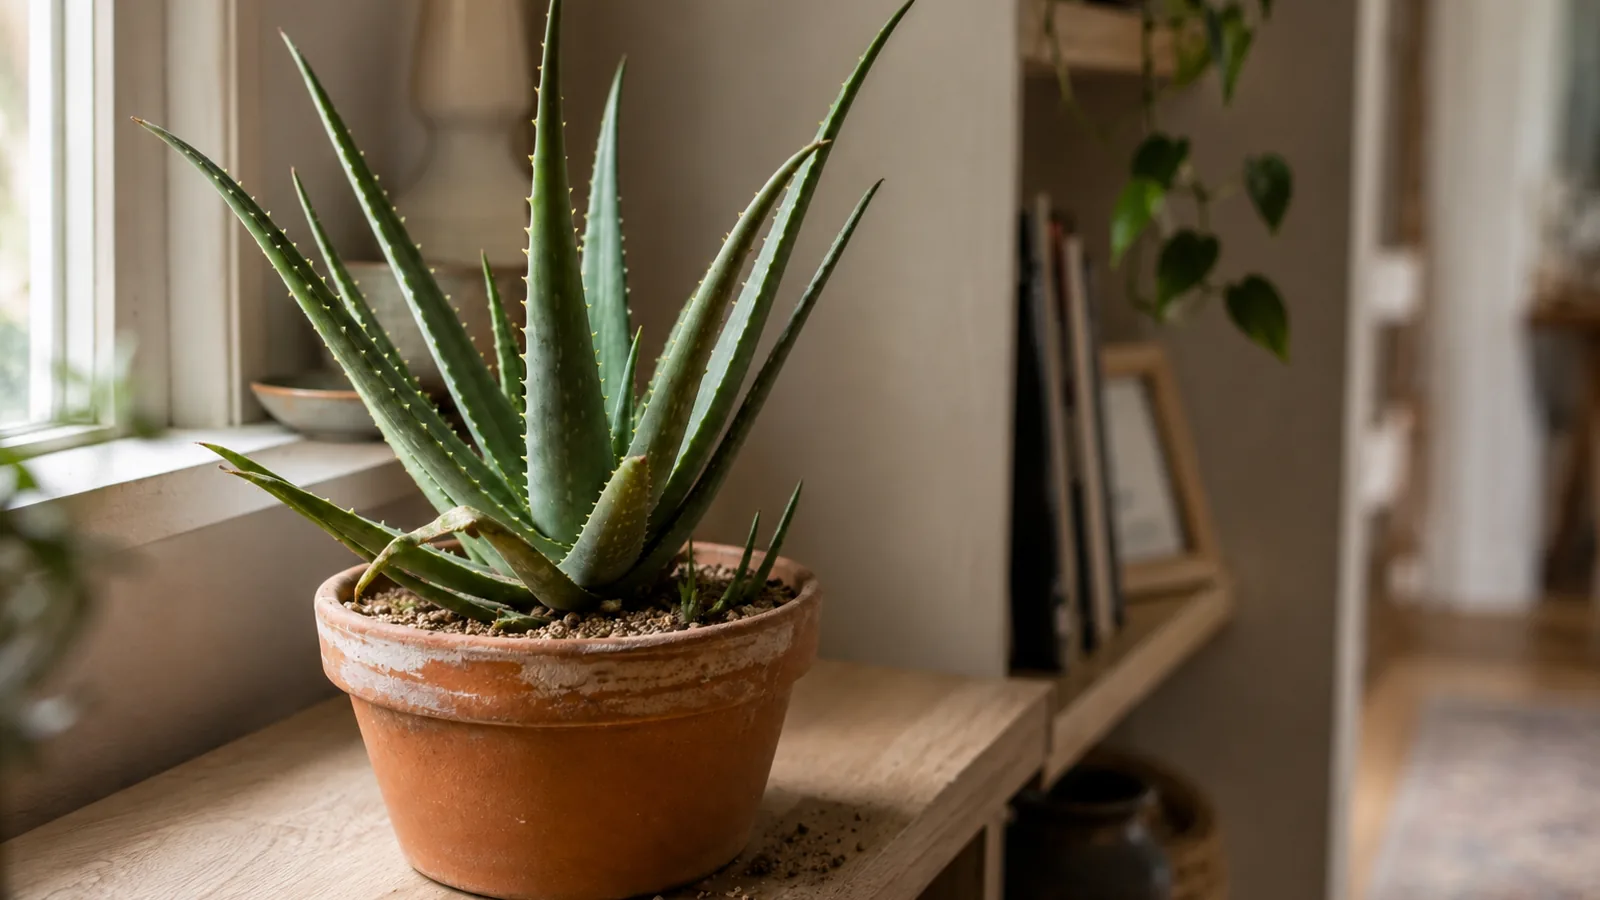
Behind the common name sits Aloe barbadensis miller, a succulent native to the Arabian Peninsula and cultivated for millennia around the Mediterranean basin. Its thick, fleshy leaves, edged with small soft teeth, form a rosette that can reach 50 to 70 cm across on a mature plant. Each leaf is a water reserve: it’s that translucent, mucilage-rich gel that made its reputation.
Contrary to what many people assume, aloe vera is not a shade plant. It’s a fully-fledged succulent, cousin to echeveria, crassula and other plants that store water in their tissues. If the world of succulents is still fuzzy to you, our complete indoor succulents guide lays out all the basics: light, watering, substrate and decline signals.
Well settled, an aloe vera easily lives 10 to 20 years, regularly produces pups, and can even bloom, sending up a tall orange flower spike. It’s a “long-term relationship” plant that will stay with you for years if you respect its three core needs: plenty of light, very little water, and a substrate that drains perfectly.
Light: bright, even direct sun
Aloe vera is a full-sun plant. Indoors, it needs the brightest light possible, ideally several hours of direct sun a day. A south- or west-facing window is the ideal spot. Facing east it will survive, but stay softer and more stretched.
Recognising a lack of light
An aloe vera short on light sends clear signals:
- The leaves, normally upright, flop and spread outward instead of pointing up.
- The plant stretches (etiolates): it lengthens, pales, and loses its compact rosette shape.
- Growth stalls for months with no new leaf at the centre.
Conversely, very intense exposure sometimes turns the leaves red-brown: that’s reversible light stress, not disease. If you move your aloe outside in spring after a winter indoors, acclimatise it gradually (a few days in partial shade) to avoid real sunburn.
To lock these notions in for good and learn to measure the light you actually have at home, our complete indoor plant light guide is the best resource. And if you’re unsure of your plant’s exact identity — there are dozens of aloe species with similar but not identical needs — SPRAIA’s photo identification clears the doubt in seconds.
Watering: the golden rule, let it dry completely
If you take just one thing away about aloe vera, take this: overwatering is by far the number one cause of death. This plant prefers drought to moisture. Its thick leaves are reserves: it can go weeks without a drop.
The method that works
- Wait until the substrate is completely dry top to bottom, from the surface to the bottom of the pot. A small wooden stick that comes out clean and dry confirms the moment.
- Then water thoroughly, until water runs from the drainage holes.
- Empty the saucer 10 minutes later: never leave standing water under the pot.
- Don’t water again before the next cycle, even if the surface has looked dry for several days.
Rough frequencies
- Summer (April-September): roughly every 15 to 20 days, depending on heat and light.
- Winter (October-March): once a month max, or even every 6 weeks. The plant is resting.
These numbers stay rough: the only real test is dry substrate. An aloe in full sun and warmth will drink more often than one in a cool room. To master the general logic of good watering — touch test, weight test, seasonal adjustment — read our when and how to water your plants guide.
The trap of “calendar” watering
Watering every Monday because “it’s plant day” is the surest way to kill an aloe vera. In winter, that rhythm delivers three to four times too much water. This is exactly the kind of spacing SPRAIA helps with: it works out watering reminders truly tuned to a succulent and the season, instead of a plain weekly timer.
Substrate and repotting: drainage above all
Aloe vera sold at garden centres almost always arrives in standard compost that’s too water-retentive, holding moisture far too long around the roots. It’s a silent cause of rot. The first move, a few days after buying, is usually to repot it into a draining mix.
The right substrate recipe
A blend that works very well:
- 50% cactus and succulent compost,
- 30% pumice or volcanic gravel (drainage and aeration),
- 20% perlite or coarse horticultural sand (never beach sand, too salty).
You can also switch to a 100% mineral substrate like pon (pumice, lava, zeolite), a favourite of collectors for its perfect drainage and near-zero rot risk. We cover this approach in our complete pon mineral substrate guide.
The pot
Always choose a pot with a drainage hole at the bottom. Unglazed terracotta is ideal: porous, it lets the substrate breathe and dry faster. Pick a pot barely larger than the root ball (1 to 2 cm of margin): an oversized pot keeps needless moisture around the roots and encourages rot.
When to repot
The best time is spring, as growth resumes. Repot every 2 to 3 years, or as soon as the pups crowd the pot. To learn everything about the process — signs it’s time, new pot size, root precautions — see our guide to repotting plants at the right time.
Propagating aloe vera from pups, step by step
This is one of the great pleasures of this plant: a healthy aloe vera spontaneously produces pups, also called offsets or “babies”, that grow at the base of the mother plant. Each can become an adult aloe, for free. Here’s how to do it cleanly.
Step by step
- Spot a pup large enough: ideally 8 to 10 cm tall, with a few well-formed leaves and, if possible, its own roots already visible.
- Unpot the mother plant in spring or summer, during active growth. Gently clear the soil to see where the pup attaches.
- Separate the pup by detaching it by hand or with a clean, disinfected knife. Try to keep as many roots as possible on the pup.
- Let the cut heal in open air for 2 to 3 days, out of direct sun. This step is crucial: replanting a fresh wound into moist substrate opens the door to rot.
- Plant the pup in a small draining pot (same substrate as the adult), without burying it too deep.
- Don’t water right away: wait one week, then give a first light watering. Keep the young plant in bright light but out of scorching sun for the first few days.
Pups that already have roots almost always take. Rootless ones need a bit more patience but root within a few weeks. If you love the idea of multiplying your plants, our water propagation guide complements this approach for other indoor species (aloe itself propagates better from pups than in water).
Uses of the gel: what to know (and the precautions)
The translucent gel inside the leaves is what makes aloe vera famous. In external, sensible use, it can soothe the skin. But a few serious precautions apply, because the whole leaf is not harmless.
Harvesting the gel
Take a mature outer leaf (the older ones, at the base). Cut it flush, stand it upright for about ten minutes so the yellow sap drains (see below), then split it and scoop out the clear gel with a spoon. Use it quickly: fresh gel keeps poorly.
Common external uses
- Soothing minor superficial burns, mild sunburn and minor skin irritations.
- Occasional hydration of dry skin.
Apply the gel in a thin layer on clean skin. Always do a patch test on a small area first: some people are allergic to it.
The important warnings
- The yellow sap under the skin contains aloin, a compound with a strong laxative and irritant effect. It’s the bitter liquid that runs out when you cut the leaf. Let it drain fully and don’t use it.
- Do not ingest the gel or the leaf without medical advice. Aloe-based food products are specially processed to remove aloin; homemade gel is not.
- Never replace medical advice with an aloe application: for a serious burn, a deep wound or a persistent skin reaction, see a healthcare professional.
- Aloe vera is toxic if ingested by cats, dogs and young children. Keep the plant out of reach. For a full overview of species to watch, see our guide to toxic plants for children and pets.
These precautions aren’t meant to discourage you, but to let you enjoy the plant with full awareness. Used externally, with common sense, aloe gel remains an ally valued since antiquity.
Common mistakes and how to fix them
Most aloe veras die from the same handful of mistakes, almost always tied to water and light. Here’s how to recognise them and react.
Soft, translucent or brown leaves at the base
This is the most classic scenario: overwatering and root rot. A leaf that turns soft, watery, translucent and detaches easily isn’t thirsty — it’s rotting. Stop watering immediately, unpot the plant and inspect the roots. Black, mushy, foul-smelling roots must be cut off with a clean tool; let the plant dry in the air for a few days before repotting into a dry, draining substrate. Our guide to saving a plant from root rot walks through the full rescue protocol.
Thin, wrinkled or folded leaves
Conversely, leaves that thin out, hollow into a gutter shape or wrinkle signal a plant that’s genuinely thirsty. It’s rare with an aloe, but possible after several months without water. A good soak-watering fixes it within days. The distinction is critical: soft and translucent = too much water; thin and wrinkled = not enough.
Leaves browning at the tips
Often linked to a one-off stress: sun too harsh after a move, very dry air near a radiator, or hard water. Nothing serious, but keep an eye on the exposure.
No-drainage pot and a full saucer
The fatal duo. An aloe in a sealed cover pot, watered “to keep things tidy”, always ends up rotting. Drill, drain, empty the saucer.
A few temperature markers
Aloe vera likes a range of 18 to 27 °C in growth and tolerates down to about 10 °C in winter rest. Below 5 °C it suffers: don’t leave it outside during the first cool nights of autumn.
Conclusion
Aloe vera isn’t a complicated plant — it’s a misunderstood one. It asks for no frequent fertiliser, no misting, no daily attention. It demands the opposite of our “caring gardener” reflexes: plenty of light, very little water, a draining substrate, and to be left alone. Respect these principles, always let the soil dry completely between waterings, and your aloe will reward you with firm, upright leaves, pups to propagate and, with a bit of luck, a flower spike.
If you’re just starting your succulent collection, aloe vera is an excellent first choice — provided you learn to read its signals. A soft leaf, a brown tip, a spreading rosette: each sign tells you something. With a little observation, and SPRAIA’s help for identification, diagnosis and spaced-out watering reminders, you’ll go from “aloe killer” to the proud owner of a plant that may well outlive a decade with you.
Frequently asked questions
- Not on a schedule. Wait until the substrate is completely dry top to bottom, then water thoroughly and empty the saucer. In practice: every 15 to 20 days in summer, once a month max in winter. The only real test stays completely dry soil.
- In the vast majority of cases, it's overwatering causing root rot. A soft, translucent leaf that detaches isn't thirsty: it's rotting. Stop watering, unpot, cut off the black roots, let dry for a few days and repot into a draining substrate.
- From its pups (offsets) that grow at the base. Pick a pup 8-10 cm tall, unpot the mother, separate it keeping its roots, let the cut heal for 2-3 days, plant in a small draining pot and only water after one week.
- Not as is. The yellow sap under the skin contains aloin, a laxative and irritant compound. Aloe-based food products are processed to remove it, which homemade gel is not. Don't ingest anything without medical advice; keep homemade gel to sensible external use.
- By the brightest window possible, ideally south- or west-facing, with several hours of direct sun a day. Avoid dark corners where it stretches. Keep it out of reach of cats, dogs and young children, as it's toxic if ingested.